Ever wondered how to remotely control a Raspberry Pi without being physically present? Well, you're in the right place! Imagine setting up your Raspberry Pi at home and controlling it from anywhere in the world—whether you're chilling at a café or lounging on a beach. Sounds cool, right? This guide will walk you through everything you need to know about remotely controlling your Raspberry Pi, step by step. So grab a cup of coffee, and let's dive in!
Remote access to a Raspberry Pi has become one of the most sought-after skills for tech enthusiasts, hobbyists, and even professionals. Whether you're building a home automation system, running a media server, or just tinkering with some cool projects, being able to control your Raspberry Pi remotely can save you tons of time and effort. Trust me, once you get the hang of it, you'll wonder how you ever lived without this skill.
Before we jump into the nitty-gritty, let's quickly clarify what we mean by "remotely controlling a Raspberry Pi." Essentially, it means accessing your Raspberry Pi's desktop or terminal from another device—be it a laptop, smartphone, or even another Raspberry Pi. Sounds easy? It is! But there are a few tricks and tools you need to know to make it work smoothly. Let's get started!
Read also:Darkvision Studios The Hidden Gem In The Gaming World
Table of Contents
- Why You Should Learn How to Remotely Control a Raspberry Pi
- Preparing Your Raspberry Pi for Remote Access
- Setting Up SSH for Secure Communication
- Using VNC for Remote Desktop Access
- Network Considerations for Remote Connections
- Essential Tools and Software for Remote Control
- Troubleshooting Common Issues
- Best Practices for Secure Remote Access
- Advanced Techniques for Power Users
- Conclusion: Take Your Raspberry Pi Skills to the Next Level
Why You Should Learn How to Remotely Control a Raspberry Pi
Let's face it—technology is all about convenience, and remote access to your Raspberry Pi is no exception. Whether you're managing a server, running scripts, or monitoring sensors, having the ability to control your Pi from anywhere is a game-changer. Here are a few reasons why mastering this skill is worth your time:
- Flexibility: Work on your projects from anywhere, whether you're at home, the office, or on vacation.
- Efficiency: No need to physically interact with your Pi every time you need to make changes or check logs.
- Scalability: If you're managing multiple Raspberry Pi devices, remote access makes it easier to keep everything in sync.
- Learning Opportunity: Understanding remote control techniques will deepen your knowledge of networking and cybersecurity.
Trust me, once you set this up, you'll wonder why you didn't do it sooner. So let's move on to the next step and prepare your Raspberry Pi for remote access.
Preparing Your Raspberry Pi for Remote Access
Before we dive into the technical details, it's essential to ensure your Raspberry Pi is ready for remote control. Here's a quick checklist to help you prepare:
Step 1: Install the Latest Raspberry Pi OS
Make sure your Raspberry Pi is running the latest version of Raspberry Pi OS. This ensures you have access to all the latest features and security updates. You can download the OS from the official Raspberry Pi website and flash it onto your microSD card using a tool like Balena Etcher.
Step 2: Connect to the Internet
Your Raspberry Pi needs to be connected to the internet, either via Ethernet or Wi-Fi. If you're using Wi-Fi, make sure your credentials are correctly configured in the `wpa_supplicant.conf` file.
Step 3: Enable SSH and VNC
SSH and VNC are two of the most popular methods for remotely controlling a Raspberry Pi. We'll cover these in more detail later, but for now, make sure they're enabled in the Raspberry Pi Configuration tool.
Read also:Ryan Goslings Cuban Connection The Untold Story You Need To Know
Once you've completed these steps, your Raspberry Pi is ready for remote access. Let's move on to setting up SSH.
Setting Up SSH for Secure Communication
SSH (Secure Shell) is one of the easiest and most secure ways to remotely control your Raspberry Pi. It allows you to access the terminal of your Pi from another device, making it perfect for running commands and managing files.
Step 1: Enable SSH on Your Raspberry Pi
To enable SSH, simply open the Raspberry Pi Configuration tool from the main menu and navigate to the "Interfaces" tab. Here, you can enable SSH with just a few clicks.
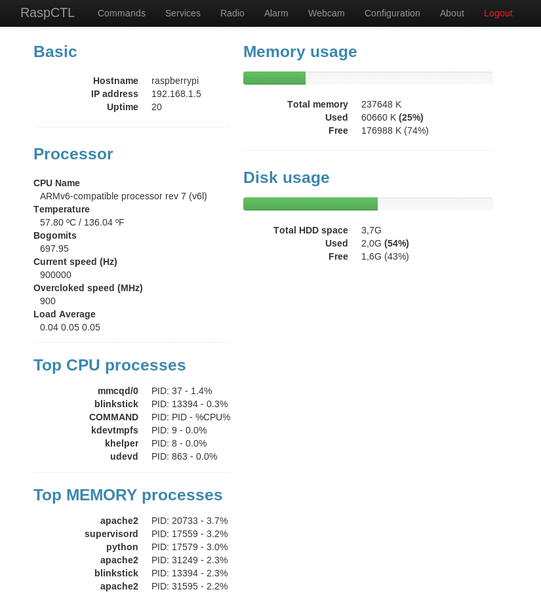
Step 2: Find Your Pi's IP Address
To connect to your Pi via SSH, you'll need to know its IP address. You can find this by typing `ifconfig` in the terminal or checking your router's device list.
Step 3: Connect Using an SSH Client
Once you have your Pi's IP address, you can connect to it using an SSH client like PuTTY (for Windows) or the built-in terminal on macOS and Linux. Just type `ssh pi@
And just like that, you're connected to your Raspberry Pi's terminal from anywhere in the world!
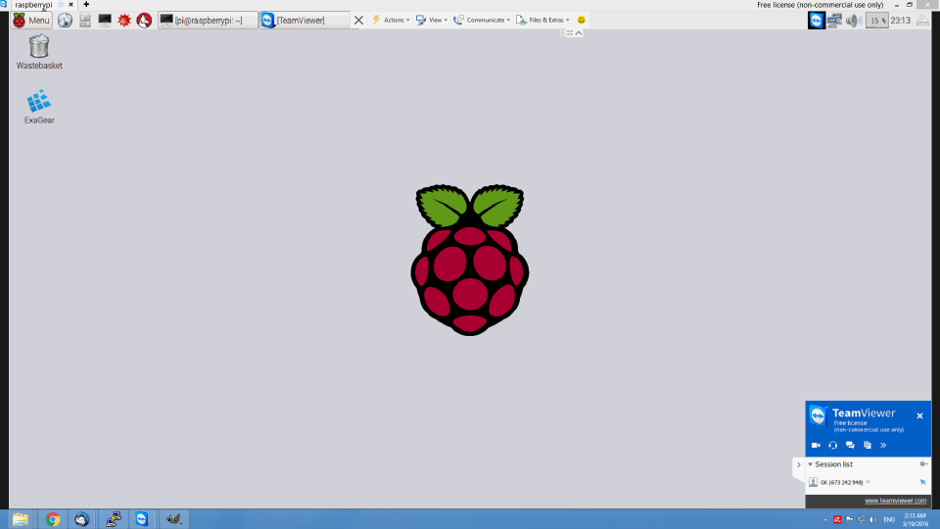
Using VNC for Remote Desktop Access
While SSH is great for terminal access, sometimes you need full desktop control. That's where VNC (Virtual Network Computing) comes in. VNC allows you to remotely access your Raspberry Pi's graphical desktop, making it perfect for tasks that require a GUI.
Step 1: Enable VNC on Your Raspberry Pi
Just like SSH, you can enable VNC through the Raspberry Pi Configuration tool. Once enabled, your Pi will start broadcasting its desktop over the network.
Step 2: Install a VNC Client
On your remote device, download and install a VNC client like RealVNC Viewer. This will allow you to connect to your Pi's desktop with ease.
Step 3: Connect to Your Pi
Using the VNC client, enter your Pi's IP address and log in with the default credentials. Voila! You now have full control over your Pi's desktop.
Whether you're editing code, managing files, or running applications, VNC gives you the flexibility you need to work efficiently.
Network Considerations for Remote Connections
When it comes to remote access, your network setup plays a crucial role. Here are a few things to keep in mind:
- Router Configuration: Make sure your router is configured to allow incoming connections on the necessary ports (22 for SSH and 5900 for VNC).
- Dynamic DNS: If your internet service provider assigns a dynamic IP address, consider using a Dynamic DNS service to keep track of your Pi's public IP.
- Firewall Settings: Adjust your firewall settings to allow secure connections while keeping your network safe from unauthorized access.
By optimizing your network setup, you can ensure smooth and secure remote access to your Raspberry Pi.
Essential Tools and Software for Remote Control
Here are some of the best tools and software you can use to remotely control your Raspberry Pi:
- PuTTY: A popular SSH client for Windows users.
- RealVNC Viewer: A reliable VNC client for desktop and mobile devices.
- TeamViewer: An all-in-one solution for remote access and support.
- NoMachine: A high-performance remote desktop solution for Linux users.
Experiment with these tools to find the one that works best for your needs.
Troubleshooting Common Issues
Even with the best setup, things can go wrong. Here are a few common issues and how to fix them:
- Connection Refused: Double-check your IP address and ensure the necessary services are running on your Pi.
- Authentication Failed: Make sure you're using the correct username and password. If you've changed the default credentials, don't forget to update them.
- Network Issues: If you're having trouble connecting, check your router settings and ensure your Pi is connected to the internet.
With a bit of troubleshooting, you'll be back up and running in no time!
Best Practices for Secure Remote Access
Security is paramount when it comes to remote access. Here are a few best practices to keep your Raspberry Pi safe:
- Change Default Credentials: Never use the default username and password for your Pi.
- Use Strong Passwords: Choose complex passwords and enable two-factor authentication if possible.
- Regularly Update Software: Keep your Pi's software up to date to protect against vulnerabilities.
By following these practices, you can enjoy the convenience of remote access without compromising security.
Advanced Techniques for Power Users
For those who want to take their Raspberry Pi skills to the next level, here are a few advanced techniques:
Port Forwarding
Set up port forwarding on your router to allow external access to your Pi's SSH and VNC services.
SSH Tunnels
Use SSH tunnels to securely access your Pi's services from behind a firewall or NAT.
Automated Scripts
Create automated scripts to perform routine tasks on your Pi, such as backups and updates.
These techniques will help you streamline your workflow and make the most out of your Raspberry Pi.
Conclusion: Take Your Raspberry Pi Skills to the Next Level
Learning how to remotely control a Raspberry Pi opens up a world of possibilities for your projects and experiments. From managing servers to automating tasks, the ability to access your Pi from anywhere is a valuable skill that will save you time and effort.
Remember to follow best practices for security and always keep your software up to date. And don't forget to share your experiences and tips with the community. Who knows? You might inspire someone else to take their first steps into the world of remote control.
So what are you waiting for? Grab your Raspberry Pi, set it up for remote access, and start exploring the endless possibilities. Happy tinkering!