Alright, listen up, folks. We’ve all been there—whether it’s because of a life change, a typo when creating your account, or simply wanting to freshen things up, updating your name on Facebook can feel like navigating a maze. But don’t sweat it! In this guide, we’re going to break down exactly how do I update my name in Facebook, step by step, so you can get back to scrolling, liking, and sharing like a pro. No more headaches, no more confusion—just straightforward answers. So, let’s dive right in, shall we?
Facebook is more than just a social media platform; it's your digital home where you connect with friends, family, and even work colleagues. Having an accurate name on your profile matters, especially if you use Facebook for professional networking or business purposes. If your current name doesn’t reflect who you are anymore, it’s time to make that change.
And hey, don’t worry if you’ve tried updating your name before and hit roadblocks. Facebook has rules, sure, but we’re here to help you navigate them. By the end of this article, you’ll not only know how to update your name but also understand why Facebook has these policies in place and how to avoid common pitfalls. Let’s get started!
Read also:Why Houston Is The Perfect Destination For Cuban Jewelries
Why Updating Your Name in Facebook Matters
Let’s talk real quick about why updating your name is such a big deal. For starters, Facebook wants its users to be authentic. They want you to use your real name because it fosters trust within the community. But life happens, right? Maybe you got married, changed your legal name, or realized that "Supreme Gamer69" wasn’t such a great idea after all. Whatever the reason, updating your name ensures your profile stays true to who you are today.
Common Reasons People Want to Change Their Names
- Marriage or divorce leading to a name change
- Legal name changes due to personal reasons
- Correcting typos or mistakes made during account creation
- Switching from nicknames to formal names
These reasons might seem straightforward, but Facebook doesn’t always make it easy. That’s where our guide comes in—to simplify the process and keep you informed.
Step-by-Step Guide: How Do I Update My Name in Facebook
Alright, let’s get down to business. Here’s a detailed walkthrough of how to update your name in Facebook:
Step 1: Log In to Your Account
This one’s a no-brainer, but hey, gotta start somewhere. Open up Facebook on your computer or mobile app and log in using your credentials. Make sure you’re signed in as the account holder whose name you want to change.
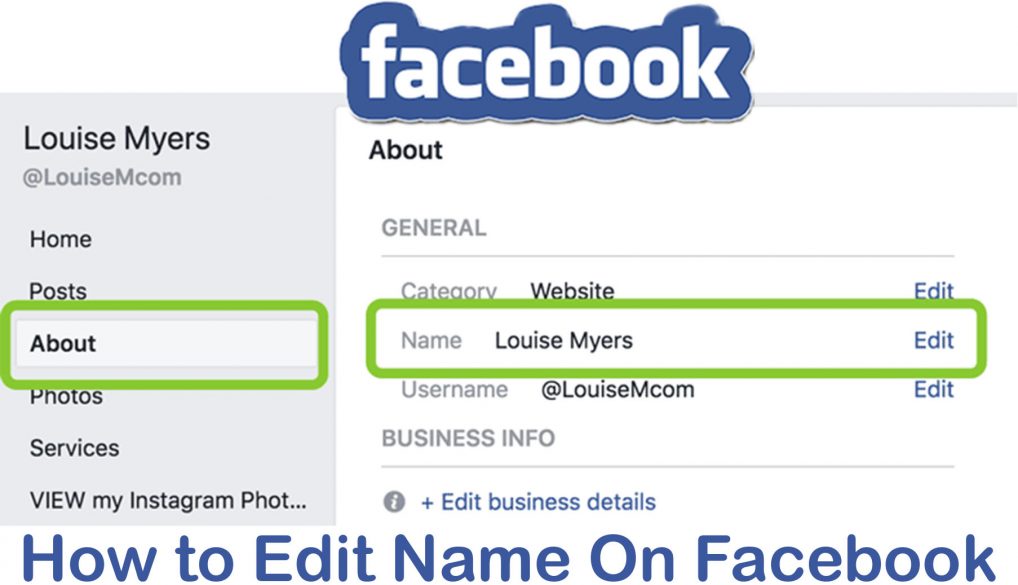
Step 2: Go to Your Profile
Once you’re logged in, head over to your profile by clicking on your profile picture in the top-right corner. This will take you directly to your timeline.
Step 3: Click on ‘Edit Profile’
On your profile page, look for the ‘Edit Profile’ button. It’s usually located near the cover photo. Clicking this will give you access to edit various sections of your profile, including your name.
Read also:Royal Shine Detailing Weatherford Your Ultimate Car Care Solution
Step 4: Edit Your Name
Now, here’s the juicy part. Under the ‘About’ section, you’ll see your name displayed prominently. Click on the pencil icon next to it to open the name editing field. Enter your new name carefully, ensuring it matches your legal documents if applicable.
Step 5: Confirm and Submit
After entering your new name, click ‘Save Changes’ or ‘Submit.’ Facebook may prompt you to verify your new name by uploading official documents like a driver’s license, passport, or marriage certificate. Be prepared for this step, especially if your name change is significant.
Facebook’s Naming Policies: What You Need to Know
Before you go changing your name willy-nilly, it’s important to understand Facebook’s naming policies. These rules are in place to prevent fake profiles and ensure authenticity across the platform. Here’s what you need to keep in mind:
Rule #1: Use Your Real Name
Facebook requires users to use their real names, as defined by government-issued IDs. If your new name doesn’t match your legal documentation, Facebook might flag it for review.
Rule #2: Limit Name Changes
You can only change your name a limited number of times per year. This restriction helps prevent abuse, such as people creating multiple accounts under different names.
Rule #3: Avoid Special Characters
Names with excessive punctuation marks, symbols, or numbers won’t pass muster. Stick to standard letters and spaces for the best results.
Tips for a Successful Name Change
Here are some pro tips to ensure your name change goes smoothly:
- Double-check your spelling before submitting
- Have your ID documents ready in case verification is needed
- Be patient—if your request requires review, it could take a few days
Remember, Facebook’s algorithms are pretty smart. If your new name seems suspicious or doesn’t align with their policies, it might get rejected. But don’t panic! You can always appeal the decision if necessary.
What Happens After You Update Your Name?
Once your name is successfully updated, the change will reflect across all areas of your Facebook profile. This includes:
1. Profile Display
Your friends and followers will see your new name next to your profile picture. Existing posts and comments will also update automatically to reflect the change.
2. URL and Links
Facebook may update your profile URL to include your new name. If you’ve shared your old URL with others, let them know about the change to avoid confusion.
3. Search Results
When people search for you on Facebook, your new name will appear in the results. This ensures you remain easy to find and connect with.
Common Issues and Solutions
Let’s address some common problems users face when trying to update their names:
Issue #1: Request Rejected
Solution: If your request gets rejected, check Facebook’s feedback for specific reasons. Then, resubmit your request with the necessary corrections or supporting documents.
Issue #2: Too Many Changes
Solution: If you’ve hit the limit for name changes, wait until the restriction period ends. Alternatively, contact Facebook support for assistance.
Issue #3: Verification Delays
Solution: Keep an eye on your email or Facebook notifications for updates on your verification status. If it’s taking too long, reach out to Facebook support for clarification.
How to Contact Facebook Support
If you encounter issues while updating your name, don’t hesitate to reach out to Facebook support. Here’s how:
- Go to the Help Center on Facebook
- Select the relevant issue (e.g., name change)
- Provide details and upload any required documents
Facebook’s support team is generally responsive, so you should receive a resolution within a few days.
Final Thoughts: Take Control of Your Facebook Identity
There you have it, folks—a comprehensive guide on how do I update my name in Facebook. Updating your name might seem like a small change, but it can have a big impact on how you’re perceived online. Whether you’re marking a new chapter in life or fixing a simple typo, taking control of your digital identity is empowering.
Now that you know the steps, there’s nothing stopping you from making that change. And remember, if you run into any hiccups along the way, Facebook’s support team is always ready to lend a hand.
So, what are you waiting for? Go ahead and give your profile the refresh it deserves. And while you’re at it, don’t forget to share this article with friends who might need it. Let’s spread the knowledge and help each other stay connected in the ever-evolving world of social media!
Table of Contents
- Why Updating Your Name in Facebook Matters
- Step-by-Step Guide: How Do I Update My Name in Facebook
- Facebook’s Naming Policies: What You Need to Know
- Tips for a Successful Name Change
- What Happens After You Update Your Name?
- Common Issues and Solutions
- How to Contact Facebook Support
- Final Thoughts: Take Control of Your Facebook Identity