Let’s be real, folks. Braiding and bun styling is the ultimate game-changer for your hair game. Whether you're a beginner or a seasoned hairstylist, mastering the art of turning a braid into a bun can elevate your look instantly. From casual everyday styles to formal event-ready hairdos, this technique is a must-have in your beauty arsenal. So, buckle up and let’s dive into the world of braid into bun styling!
Now, I know what you’re thinking—“Isn’t this just braiding and looping my hair?” Well, my friend, it’s a bit more than that. The braid into bun transformation is all about finesse, creativity, and a little bit of hair wizardry. Whether you’re rocking beachy waves or sleek, polished strands, this technique can work wonders for your hair goals. So, let’s break it down step by step and make sure you’re equipped with all the tips and tricks you need.
Let me give you the lowdown. This guide isn’t just another random tutorial. It’s packed with expert advice, insider tips, and a sprinkle of sass to keep things fun. By the time you finish reading, you’ll be ready to braid, twist, and bun your way to hair perfection. No salon required. Let’s get started!
Read also:Proud Family The Gross Sisters Journey Through Animation And Beyond
Understanding the Basics: What Is Braid Into Bun?
Before we dive deep into the nitty-gritty, let’s talk about the basics. A braid into bun is exactly what it sounds like—starting with a braid and transforming it into a beautiful bun. But here’s the kicker: there’s more than one way to achieve this look. From loose, bohemian styles to tight, polished buns, the possibilities are endless.
The beauty of this technique lies in its versatility. You can customize it based on your hair type, length, and personal style. Plus, it’s a great way to switch up your look without spending hours in front of the mirror. Who has time for that, right?
Why Should You Learn Braid Into Bun?
Here’s the deal: learning how to create a braid into bun is not just about styling your hair. It’s about empowering yourself to experiment and express your creativity. Here are a few reasons why this technique deserves a spot in your beauty routine:
- Time-Saving: Need to look put-together in a hurry? This style is your best friend.
- Low Maintenance: Once you’ve mastered the technique, it’s easy to maintain throughout the day.
- Versatile: Works for all hair types and lengths, from short bobs to long tresses.
- Cost-Effective: No need for expensive tools or products. Just a few hair ties and you’re good to go.
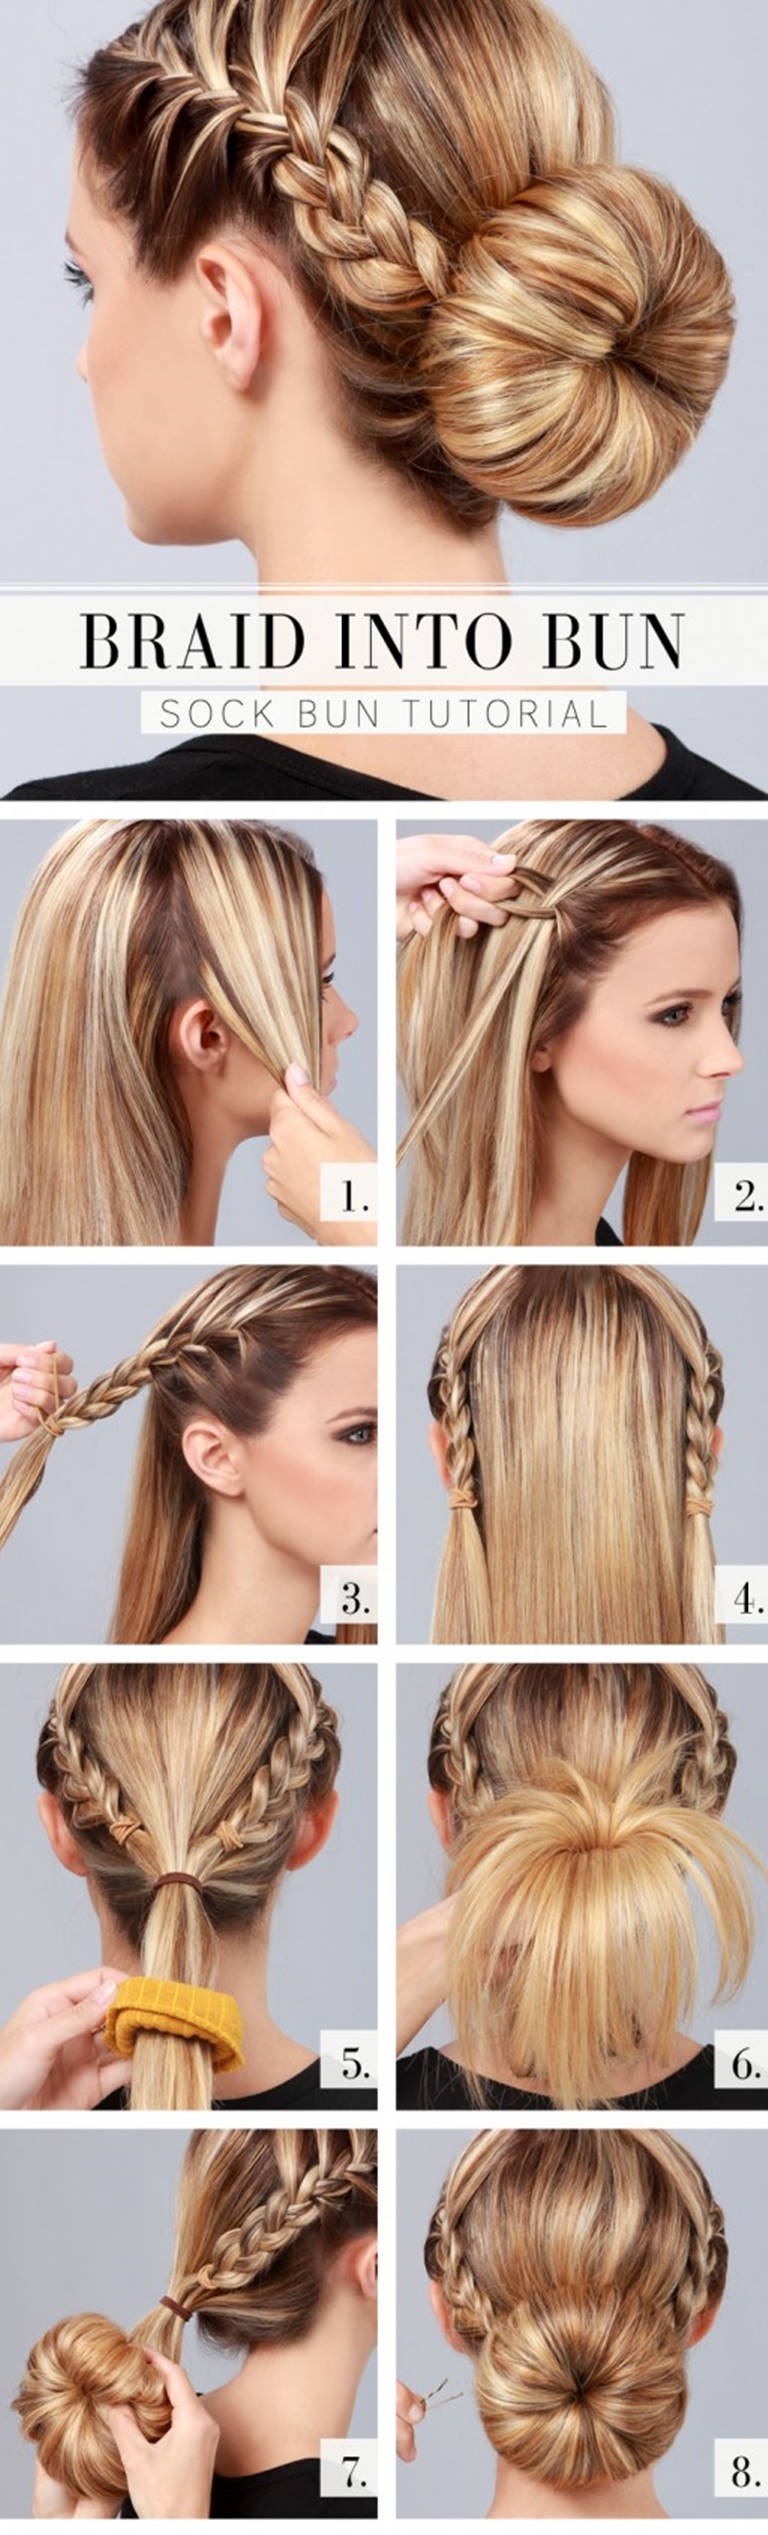
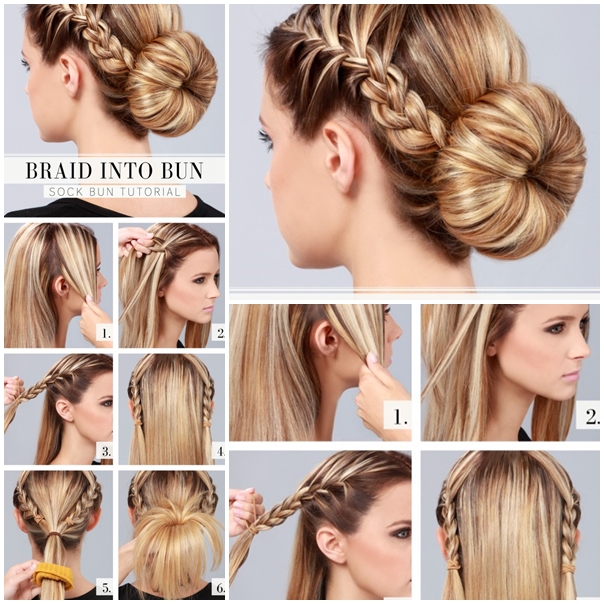
Step-by-Step Guide to Creating a Braid Into Bun
Alright, let’s get down to business. Here’s a step-by-step guide to help you master the art of braid into bun:
Gather Your Tools
Before you start, make sure you have everything you need. Trust me, having the right tools makes all the difference. Here’s what you’ll need:
- Hairbrush or comb
- Hair ties (elastic bands)
- Hairpins or bobby pins
- Hairspray (optional)
- A mirror (preferably one that allows you to see the back of your head)
Step 1: Prep Your Hair
Start by brushing your hair to remove any tangles. If you have flyaways, a small amount of hairspray or styling cream can help tame them. For an extra polished look, you can also apply a little bit of mousse or gel to your hair before starting.
Read also:Temu Accept Invitation Bot Your Ultimate Guide To Boosting Connections
Step 2: Create a Braid
Now, it’s time to braid. You can go for a classic three-strand braid, a fishtail braid, or even a Dutch braid if you’re feeling adventurous. The choice is yours! Just make sure the braid is secure and not too loose.
Step 3: Twist and Wrap
Once your braid is ready, gently twist it and wrap it around the base of the braid to form a bun. Secure it with a hair tie or bobby pins. Don’t be afraid to tease the bun a little to add volume and texture.
Step 4: Finish with Hairspray
Finally, spritz some hairspray to lock everything in place. And voilà! You’ve got yourself a stunning braid into bun.
Common Mistakes to Avoid
As with any hairstyle, there are a few common mistakes to watch out for. Here are some tips to help you avoid them:
- Don’t Braid Too Tight: A loose braid will give your bun a more natural, effortless look.
- Secure the Bun Properly: Nothing’s worse than a bun that falls apart halfway through the day.
- Don’t Overdo the Hairspray: While hairspray is great for holding everything in place, too much can leave your hair feeling stiff and sticky.
Styling Variations: Get Creative with Your Braid Into Bun
Once you’ve mastered the basics, it’s time to experiment with different styles. Here are a few variations to try:
1. Loose Bohemian Bun
This style is perfect for casual days or beach vacations. Simply create a loose braid and wrap it into a messy bun. Leave a few strands loose for a more relaxed look.
2. Polished Updo
For a more formal look, go for a tight braid and wrap it into a sleek bun. Use plenty of bobby pins to secure everything in place and spritz with hairspray for added hold.
3. Half-Up Half-Down Style
This style is great for medium-length hair. Create a braid at the crown of your head and wrap it into a small bun. Leave the rest of your hair down for a chic, effortless look.
Expert Tips for Perfecting Your Braid Into Bun
Here are a few expert tips to help you take your braid into bun game to the next level:
- Use a texturizing spray to add volume and grip to your hair.
- Experiment with different braid patterns to create unique buns.
- Don’t be afraid to mix and match styles—half braids, half buns, and everything in between!
FAQs About Braid Into Bun
1. Can I Do This Style with Short Hair?
Absolutely! While longer hair is easier to work with, short hair can still pull off a braid into bun look with a little creativity. Try using small braids or twists to create a compact bun.
2. How Long Does This Style Last?
With proper care, a braid into bun can last all day. Just make sure to secure it properly and use hairspray to keep everything in place.
3. Do I Need Special Tools?
Nope! All you need is a brush, hair ties, bobby pins, and optionally, hairspray. No fancy tools required.
Conclusion: Take Your Hair Game to the Next Level
And there you have it, folks! The ultimate guide to mastering the art of braid into bun. Whether you’re a beginner or a pro, this technique is sure to elevate your hair game. Remember, practice makes perfect, so don’t be afraid to experiment and find what works best for you.
So, what are you waiting for? Grab your tools, fire up your creativity, and get ready to rock the braid into bun look. And don’t forget to share your creations with us in the comments below. Happy styling!
Table of Contents
- Understanding the Basics: What Is Braid Into Bun?
- Why Should You Learn Braid Into Bun?
- Step-by-Step Guide to Creating a Braid Into Bun
- Gather Your Tools
- Step 1: Prep Your Hair
- Step 2: Create a Braid
- Step 3: Twist and Wrap
- Step 4: Finish with Hairspray
- Common Mistakes to Avoid
- Styling Variations: Get Creative with Your Braid Into Bun
- Expert Tips for Perfecting Your Braid Into Bun
- FAQs About Braid Into Bun
- Conclusion: Take Your Hair Game to the Next Level